Skip to Content
GenerationLauncher

Campaign Launcher

The Campaign Launcher turns the creatives and landing pages already in your library into a complete Meta ad structure — campaigns, ad sets, and ads — without you wiring the hierarchy by hand. This page is the reference for every option in the four-step wizard.

Open it at Launcher. If this is your first campaign, walk through Launch your first campaign first; for the full recipe from a product to a running ad, see From product to live ad.

How the Launcher thinks

You choose the ingredients — some creatives, one or more pages — and the Launcher assembles the Meta structure for you. It reads what each creative was built from (its product, marketing angle, customer avatar, and hooks) and groups by that shared lineage: creatives that share a product and angle land in the same Campaign and Ad Set, and each creative is paired with a page to become an Ad. Pick two creatives from the same product angle and one page, and you get one campaign, one ad set, and two ads — automatically. The Breakdown shows exactly how that grouping happened, and lets you change where each variable splits.

Before you start

  • Meta connected. Your ad account and Facebook page come from Meta. Connect them under Integrations — see Connect Meta and your ad platforms.
  • At least one creative and one page in your library. Build them in Studio.
  • Your Meta account chosen in Launch Settings (below). This is a one-time step per store.

Launch Settings

The gear at the top right of the toolbar opens the Launch Settings panel — the defaults that apply to every launch from this store. It has five tabs: Structure, Account, Campaigns, Ad Sets, and Ads.

Launch Settings panel on the Account tab with the Vital Root ad account and page chosen

Account (required, one-time) — where your ads live:

  • Ad Account — the Meta ad account billed for the campaign. Vital Root uses Vital Root Ads.
  • Facebook Page — the page that owns the ads; shoppers see this name on every ad.
  • Pixel — the tracking pixel for conversions. Recommended, and required if your objective is sales.
  • Instagram Account — optional; link one to also run ads on Instagram placements.

Click Save Settings — the tab reads Settings saved once stored.

The Campaigns, Ad Sets, and Ads tabs hold the per-level settings for the launch you’re building (covered under Step 3). On any of those tabs, Save as store defaults stores the current values so every future launch starts from them. The Structure tab decides where each variable splits — see Splits and the Breakdown.

If the Account tab shows no ad accounts or pages to choose from, your Meta account isn’t connected yet. Connect it under Integrations first — the lists fill in from Meta.

Step 1 — Select Creatives

The Launcher opens on Select Creatives, which is your Ad Creatives library embedded directly in the wizard. Click a card to select it; click again to deselect. Selecting two or more is what makes the Launcher build a multi-ad test.

Filter with the same structured search the Library uses — name:, type:, status:, source:, and id: — so you can type name:Daily Greens to narrow to one product’s creatives. As you select, the Breakdown button in the footer collects the shared lineage it found (product, angles, avatars, hooks). Click Next when you’re happy.

Step 2 — Select Pages

Select Pages works the same way for your landing pages. Choose the page (or pages) your ads should send clicks to, using the same name:, type:, status: search grammar.

The Launcher pairs your creatives with your pages: each selected creative is matched to a page it fits to form one ad. Pick one page and every creative points at it; pick several and the Launcher matches each creative to its most congruent page. Click Next.

Step 3 — Structure & Settings

This is where the plan comes together. Three columns lay out exactly what will be created in Meta, left to right: Campaigns → Ad Sets → Ads, each with a live count. The chips under each column header show which of your variables drove that level’s grouping. Selecting a campaign or ad set card filters the columns to its branch — and opens that entity’s own settings panel (see Per-entity overrides).

Structure step with the three columns, the naming template palette open, and the Daily Greens campaign card

Naming templates

Each column header has an editable naming template that names every entity at that level. Placeholders in curly braces fill in from your library — click into a template to see every placeholder available at that level.

The defaults follow how your launch is split: if products group your campaigns, the campaign template starts as {product_name} -- {date}; ads default to {creative_name} x {page_name}. Structural placeholders like {date} and {index} are always available, a level can use the placeholders of anything it or its parents split by ({campaign_name}, {adset_name} included), and consistent names here are what let you find the campaign later in Analytics.

If a template references a placeholder that doesn’t exist at its level — say {product_name} on campaigns when products vary per ad set — the Launcher blocks the launch and tells you which placeholder to remove, so no campaign ever ships with a raw {placeholder} in its name.

Campaign settings

Open Launch Settings ▸ Campaigns for the campaign level:

Campaigns tab with objective, budget, bidding, and delivery settings

  • Objective — what Meta optimizes for. Sales is the right choice for most stores.
  • Budget — the ABO ⇄ CBO switch. CBO sets one Daily budget (per campaign) and lets Meta split it across ad sets; ABO sets a Daily budget (per ad set) instead. A launch has no budget until you enter one.
  • Bidding — how Meta bids in the auction. Highest volume is the default; Bid cap, Cost per result goal, and ROAS goal reveal an amount field when chosen.
  • DeliveryInitial status: whether campaigns start Paused or Active.

Initial status: Active starts real delivery and spends your budget the moment you launch. Launch Paused the first time, confirm everything in Meta Ads Manager, then switch it on there.

Ad set settings

Open Launch Settings ▸ Ad Sets for the ad set level:

Ad Sets tab with optimization, audience, schedule, and EU compliance settings

  • Optimization — the optimization goal and billing event (derived from your objective, shown read-only), the Conversion event the campaign optimizes toward (Purchase for most stores), and the Attribution window.
  • Audience — a one-line summary of who will see the ads. Click it to open the Audience Targeting sheet (below). A location or a custom audience is required before you can launch.
  • Schedule — optional Start and End times. Leave empty to start delivering as soon as ads are approved.
  • EU compliance (DSA) — the Beneficiary and Payor legal entities, required when targeting EU countries.

Clicking the audience row opens the Audience Targeting sheet:

Audience Targeting sheet with United States chosen as the location

  • Location — countries your ads run in. Region shortcuts like North America and Europe (EU) add several countries at once, or search for one.
  • Demographics — the Age Range slider and Gender (All, Male, Female).
  • Interests — interest-based targeting, searched from Meta’s catalog.
  • Custom Audiences — audiences already saved in your ad account (retargeting, lookalikes). A custom audience satisfies the “required audience” rule on its own.
  • Platforms — where ads appear; All platforms by default (Facebook, Instagram, and more).

Edits stay as Unsaved changes until you click Apply Targeting. Reset discards them.

Ad settings

Open Launch Settings ▸ Ads for the ad level:

Ads tab with the call to action select and URL parameters field

  • Call to action — the button on the ad: Shop Now, Learn More, Sign Up, Buy Now, Get Offer, Subscribe, Contact Us, Download, and more.
  • URL parameters (optional) — extra tracking parameters appended to the ad’s link. Omnymous already stamps its own tracking onto every launched ad automatically, so attribution works without touching this field; use it only for parameters your other tools need (for example utm_term=summer).
  • Advantage+ enhancements — Meta’s automatic creative touch-ups. The switch is shown but not yet controllable from here; launches use your Meta account’s defaults.

Per-entity overrides

Click any campaign or ad set card in the columns to open that entity’s own panel. It inherits everything from the launch settings until you override it — a different daily budget for one ad set, or replacement targeting for one audience. Overridden fields are marked, with a reset back to the inherited value.

The same panel is where you link an existing Meta campaign or ad set instead of creating a new one: hover a card and use the link affordance to pick a live entity from your ad account. New ad sets are then created under the existing campaign (or ads attach into the existing ad set, inheriting its budget and targeting).

Scale guardrails

The plan header warns you when a test gets large, because oversized tests learn poorly:

  • More than 50 adsMeta recommends <50 per ad set for optimal learning.
  • More than 100 adslarge test. Consider reducing variables or consolidating.
  • More than 250 ads — a red error: will likely exhaust budget before optimization. Reduce to <250. Trim the number of creatives or pages before launching.

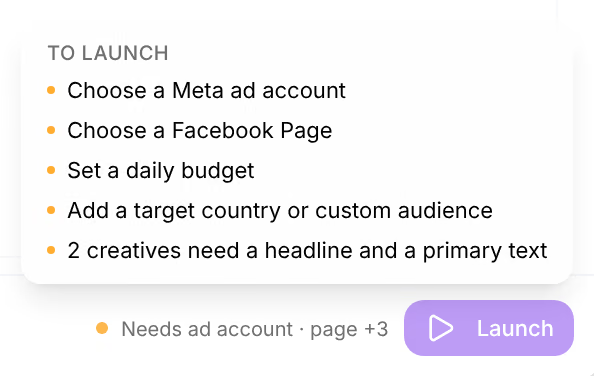
The footer summarizes the launch: Back and Reset on the left, the Breakdown toggle in the middle, and Launch on the right. Launch stays dimmed until the plan is fundable and targetable — hover it to see exactly what’s missing, or click the amber hint next to it (for example Needs budget · targeting) to jump straight to the fix.

Splits and the Breakdown

The Breakdown button in the footer opens a dock that draws your launch as a flow: every product, angle, avatar, and hook, connected through the campaign, ad set, and ad that carries it — with each creative × page pairing scored for how well they match.

Breakdown dock showing the lineage flow from variables through campaign, ad set, and ads

Where each variable splits is decided in Launch Settings ▸ Structure. Every variable type found in your creatives gets a three-way switch — one campaign per value, one ad set per value, or vary per ad — and presets apply a whole layout at once: Full hierarchy (products → campaigns, angles & avatars → ad sets), Campaign per product, Campaign per angle, Campaign per avatar, or One mega campaign. The counts at the top of the dock update live, so you can watch a split turn three angles into three ad sets before you commit to anything.

Step 4 — Launch

Clicking Launch deploys to Meta and turns the plan into a live board: the same campaigns, ad sets, and ads from Step 3, each row updating as it’s created. You can leave the page — the launch keeps running in the background, and the bell icon tracks it.

Launch step with every ad created, Meta ids on each row, and the Open Ads Manager button

  • The left panel tracks the total — percentage, created and failed counts, and a Deployment summary of what’s shipping (counts, delivery status, budget, ad account).
  • Every ad row starts Queued and moves through Uploading media and Creating to Created — or Failed, with the reason on the row. Once created, each campaign, ad set, and ad shows its Meta id (click to copy) and a direct link into Ads Manager.
  • The filters above the board (All, Created, Failed, Queued) narrow the rows; after a launch with failures the board focuses the Failed view for you.
  • If some ads fail, the left panel groups them by reason — twelve ads failing on the same budget error is one card, not twelve rows. Click a reason to see the affected ads.

When everything is created you’ll see All ads created with Open Ads Manager — and a reminder that campaigns launched Paused need delivery enabled in Ads Manager. Back to Structure returns you to Step 3 to adjust and launch again.

What happens next

Your campaign appears in Analytics → Campaigns. Once the ads start delivering, spend, orders, and which creative drove them build there and in Creatives. If you launched Paused, switch the campaign on in Meta Ads Manager when you’re ready for it to spend.

Your progress is saved

The Launcher saves your setup as you go — the Saved automatically chip at the top right confirms it. Leave for another page or close the tab entirely: your selections, structure, and settings are waiting when you come back.

To start over instead, click Reset in the footer (next to Back). It clears the current setup and returns the wizard to Step 1.

Troubleshooting

The Launch button is dimmed — something the launch needs is missing. Hover the button to see the checklist, or click the amber hint next to it (for example Needs budget · targeting) — it opens the panel that holds the fix.

No ad accounts or pages to choose from — your Meta account isn’t connected. Connect it under Integrations, then reopen Launch Settings ▸ Account. See Connect Meta and your ad platforms.

“Campaign name uses a placeholder that isn’t available” — a naming template references a variable that doesn’t exist at that level (for example {product_name} on campaigns when products vary per ad set). Click into the template and rebuild it from the placeholders it suggests — those are always safe.

An ad shows Failed on the launch board — the reason is on the row, and the left panel groups every failure by cause. The other ads still launch; fix the flagged creative or page and run the Launcher again just for it.

The header shows a red error about too many ads — you’re over 250 ads. Reduce the number of creatives or pages so the test can optimize before it burns through budget.