
Connect your AI agents
Mint an agent key, connect Claude Code, Claude Desktop, Cursor or any MCP client to your workspace through the Omnymous MCP, and revoke a key.

The Omnymous MCP lets your own AI agents search and read your workspace, and build in it: the Library, products, campaigns, analytics and research. Any MCP client can connect, such as Claude Code, Claude Desktop or Cursor. Each agent signs in with an agent key: a key of the workspace, with the scopes you grant it.
Before you start
- You are an owner or an admin of the workspace.
- The agent you want to connect, installed on your computer.
Create an agent key
Open AI & Agents
Open your account menu and choose AI & Agents. Omnymous MCP is the last card, with the address agents connect to:
https://app.omnymous.com/mcp.Press New agent key
New agent key is under the address. The New agent key window opens.
Name it and choose its scopes
Under Key name, type what the key is for, such as Claude Code. Under Scopes, the four that only read are ticked; tick library:write to let the agent change your Library, and research:run to let it start research. Expiry sets when the key stops working: never, or after 30 days, 90 days or a year.
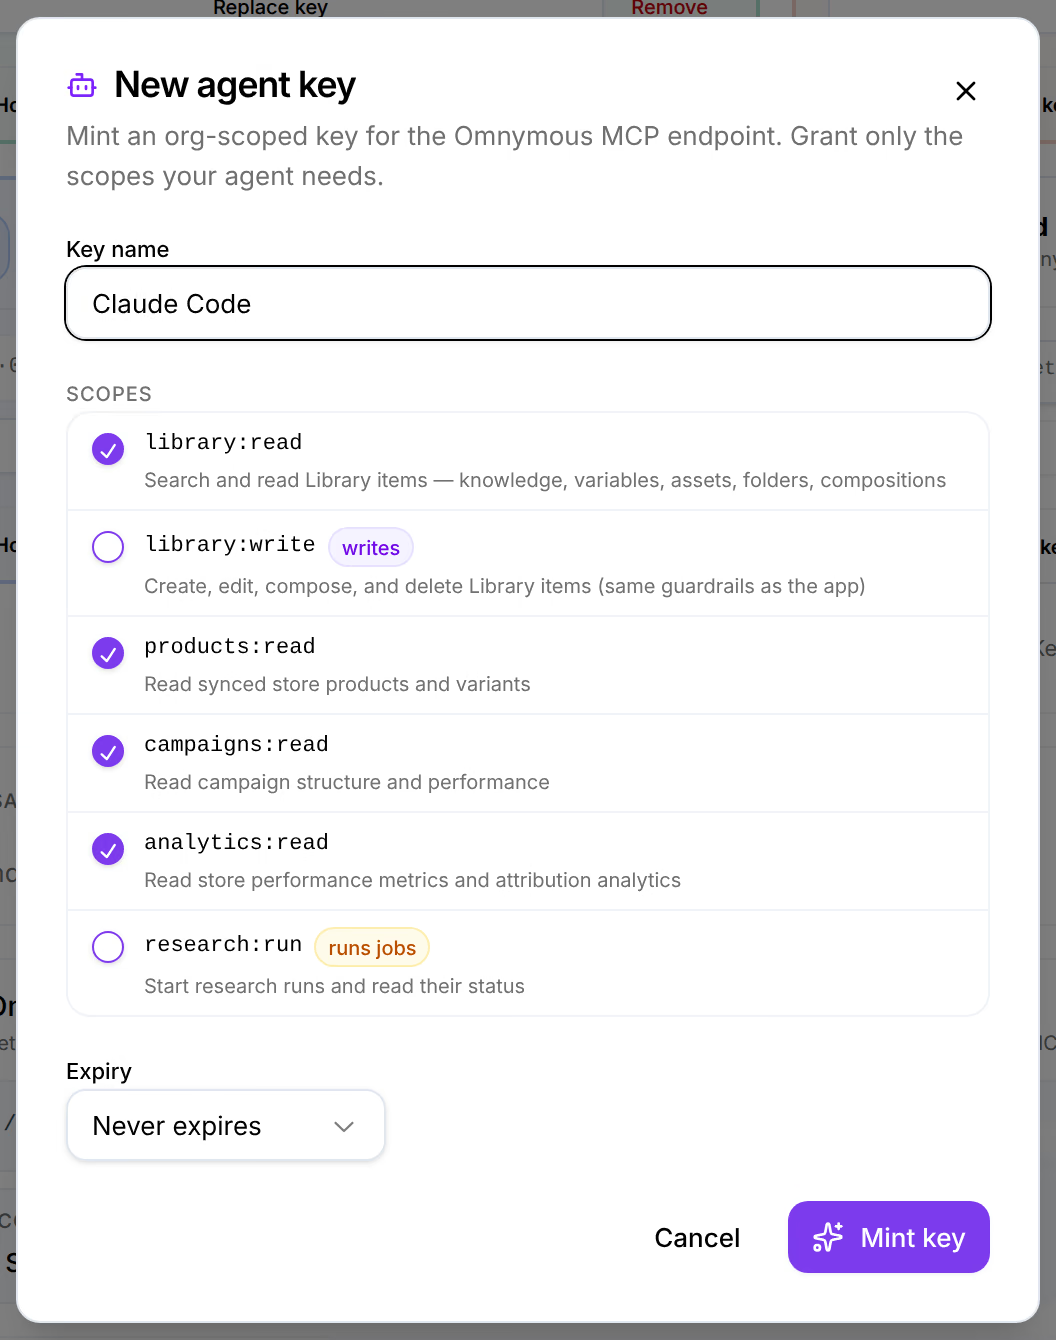
Press Mint key and copy the key
The window reads Claude Code is ready, with the key. It is shown only once: Omnymous stores a hash of it, not the key. Copy it now, or copy the ready-made Claude Code command or MCP config under it, which already hold it.
Press I’ve saved my key
The key is listed under Keys, with its scopes.
Connect your agent
- Claude Code: run the copied command in a terminal. It adds Omnymous as an MCP server named
omnymous. - Claude Desktop, Cursor and other MCP clients: add the copied MCP config to the client’s MCP servers. It names the address and sends the key as a
Bearertoken in theAuthorizationheader.
Check that it worked
Ask your agent what it can do in Omnymous: it lists the Omnymous tools, such as searching the Library and reading your campaigns’ performance. On AI & Agents, the key shows when it was last used.

What each scope allows
| Name | What it does |
|---|---|
| library:read | Search and read Library items: knowledge, variables, assets, folders and compositions. |
| library:write | Create, edit, compose and delete Library items, with the same guardrails as the app. |
| products:read | Read your stores’ synced products and variants. |
| campaigns:read | Read your campaigns’ structure and performance. |
| analytics:read | Read store performance and attribution analytics. |
| research:run | Start research runs and read their status. |
Give a key only the scopes its agent needs. A key reaches the whole workspace, every store included.
Revoke a key
On the key’s row, press Revoke. Revoke agent key? says that agents using it lose access at once, and that it cannot be undone; confirm with Revoke key. Revoke a key that may have leaked, and mint a new one.
A key stops working by itself when its creator leaves the workspace; its row says so.
If something goes wrong
| What you see | What to do |
|---|---|
| Mint key is greyed out | Type a name and keep at least one scope ticked. |
| No New agent key | Only owners and admins mint keys. |
| The agent is refused, or cannot reach Omnymous | Check that it uses the whole key and the address above. A revoked or expired key is refused: mint a new one. |
| You lost the key | It cannot be shown again. Revoke it and mint a new one. |
Related
- AI keys and usageReplace, check or remove the provider keys your workspace generates with, and read what they spent this month, by model and by type.
- How Omni answersOmni answers questions about your store with figures from the analytics engine, says where each comes from, and offers the next step as a button.