
Add your AI keys
Create an API key with each AI provider Omnymous uses, add it in setup or in AI & Agents, and see what each one pays for.

Omnymous generates with your own keys, so each provider charges what a run costs to your account with them; Omnymous adds no charge per generation. Setup asks for a key from every provider marked Required. The video provider is Optional.
| Provider | In setup | What it runs |
|---|---|---|
| OpenAI | Required | Content and image generation |
| Anthropic | Required | Content generation and page creation |
| Google Gemini | Required | Deep research, content and images |
| Higgsfield | Optional | Video generation |
Before you start
- An account with each provider. OpenAI and Anthropic keys generate only once the account has billing credit; Gemini has a free tier.
- Setup’s Connect AI keys step, or AI & Agents in your account menu once setup is done.
Create a key and add it
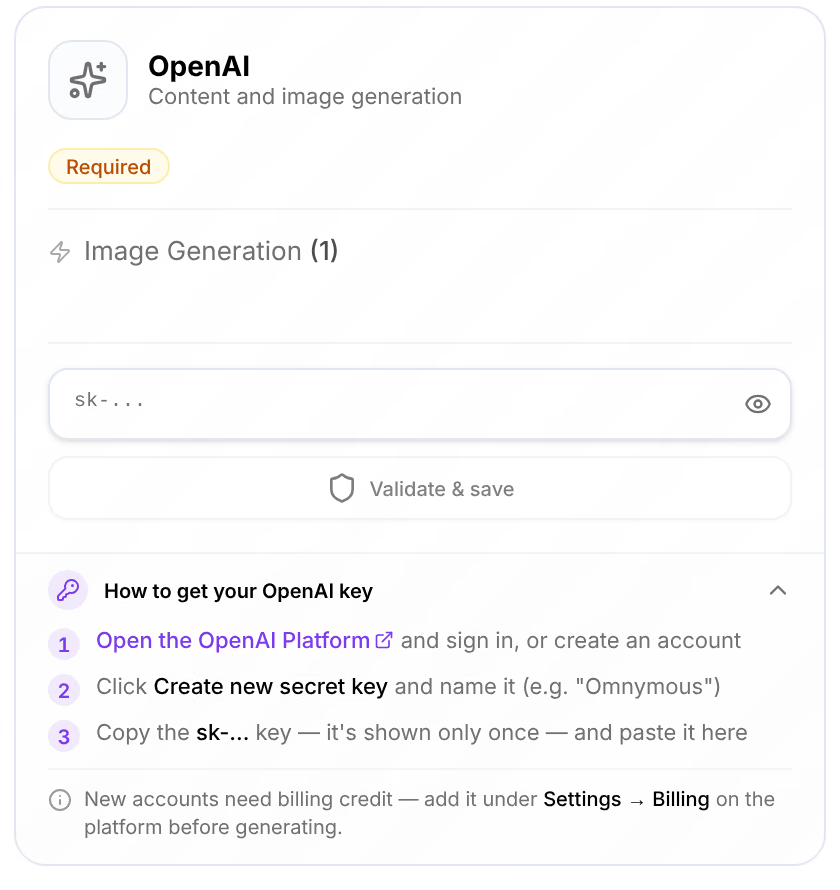
Open the provider’s how-to
Each provider’s card ends with How to get your … key. It links to the provider’s site and lists the steps there.
Create the key on the provider’s site
- OpenAI: in the OpenAI Platform, click Create new secret key and name it. The key starts with
sk-. - Anthropic: in the Anthropic Console, go to API Keys and click Create Key. The key starts with
sk-ant-. - Google Gemini: in Google AI Studio, click Create API key and pick or create a Google Cloud project. The key starts with
AIza. - Higgsfield: in the Higgsfield Console, go to API keys and click Create. You get a key id and a key secret: paste them as one value,
key_id:key_secret.
A key is shown only once: copy it straight away.
- OpenAI: in the OpenAI Platform, click Create new secret key and name it. The key starts with
Paste it and press Validate & save
Omnymous checks the key with the provider before it saves it. Keys are stored encrypted and never shared.
Check that it worked
The strip under the cards counts the required providers that have a key, as in 3 of 3 required providers configured, and Next becomes available.
Change a key later
In your account menu, AI & Agents lists each provider’s key and its standing: Active, or Rejected once the provider has refused it, for example when the account has run out of credit. A rejected key has Check again and Replace key.
If something goes wrong
| What you see | What to do |
|---|---|
| Next stays greyed out | A provider marked Required has no key yet. The strip under the cards says how many do. |
| “Could not reach … to validate the key” | The provider did not answer. Wait a moment, then press Validate & save again. |
| A key reads Rejected | Add credit on the provider’s site, or create a new key there. Then press Check again, or Replace key with the new one. |
| OpenAI or Anthropic generations fail on a new account | The account needs billing credit: OpenAI under Settings → Billing, Anthropic under Plans & Billing. |
Related
- Set up your workspaceSetup's seven steps in order, what each one asks for, which ones you can skip, and the three it does not go back to.
- Connect your ad accountsConnect Meta to launch ads and read their results, and Google and TikTok to read theirs, during setup or later in Settings.